Bottle Cutting - What You Need To Know
There are countless ways to cut glass and cut or break a glass bottle or jar and having tried them all I thought it was about time I shared my favourite method with you. This method is foolproof. It's quick and easy and leaves you with the cleanest cut.
There are other more convoluted and elaborate methods out there for cutting glass bottles but you don't need to be putting anything in the oven, blow torching anything, heating wire, or string or putting bottles into freezers, so cast those ideas to one side.
First I'll explain in detail, along with images, my method of cutting glass bottles that anyone can do at home with just one tool. I'll then go on to show you how to smooth off the edges for that professional look without the use of a kiln or heat.
If you're reading this then I'm sure you have many intentions of what wonderful things you'll be doing with your recycled wine and beer bottles once you've cut them, but if you need some ideas I'll add some at the bottom of the article with which to inspire you.
Firstly, let's get our bottle prepared by removing the labels.
Removing the Labels From Glass Bottles.
Some labels will peel off easier than others so let us go through the steps.
1. Submerge the bottle in a sink with hot water and leave for 10 minutes. With this method, some labels will just peel off nicely and easily.
2. Some labels will only be softened with the above method so in this case scrape what you can off with a knife and then use a kitchen scrubbing brush or wire brush to remove the rest.
3. If there's still sticky residue left that won't come off with your kitchen scrubbing brush, rub a little nail varnish remover or lighter fluid onto it and this will come away.
Helpful Note: Labels can be used as a cutting guide if they are in the place where you want the break to be. Leave them on and remove them later once you've cut the bottle.
Since publishing this article someone has written in to tell us his method of removing the labels from bottles. I've not tried it yet, but this sounds good:
1. Use a paste of equal parts olive oil and baking soda.
2. Rub the paste onto the label
3. Leave for a few minutes then scrub off. The label and glue will just fall apart.
How to Cut Glass Bottles with a Glass Cutter and Water
There are many varieties of cutters but a regular dry wheel cutter will suffice. (See further on in this article to read about oil cutters)
A good glass cutting tool is very affordable and if you buy one with a tungsten carbide cutting wheel such as the well known brand 'Toyo' it will last you for years and ensure a clean scored line each time. The right tools for the job will ensure straight cuts, precise cuts and a perfect score every time.
What You Will Need:
- 1 x hand held Glass Cutter ('Toyo' are an exceptional glass cutter brand)
- Masking tape
- Boiled water
- Running Cold water tap
- Rubber glove (to hold the bottle whilst pouring boiling water)
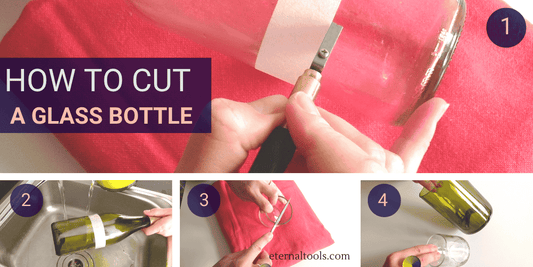
Step 1. How To Cut A Glass Bottle - Mark Your Cutting Line
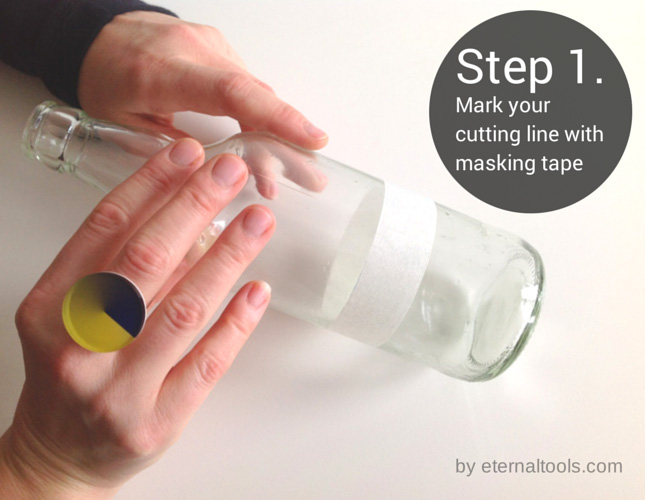
- Place a strip of masking tape around the glass bottle where you wish to cut. This will act as your guide and ensure you have a neat circle that meets around the bottle. Make sure that where the ends of the masking tape meet up that you have a neat straight line, this will help ensure you don't have a jagged cut.
Helpful Note. As I mentioned earlier, labels can be used as a cutting guide if they are in the place where you want the break to be. Leave them on and remove them later once you've cut the bottle.
Step 2. Cutting Glass Bottles - Score Your Cutting Line
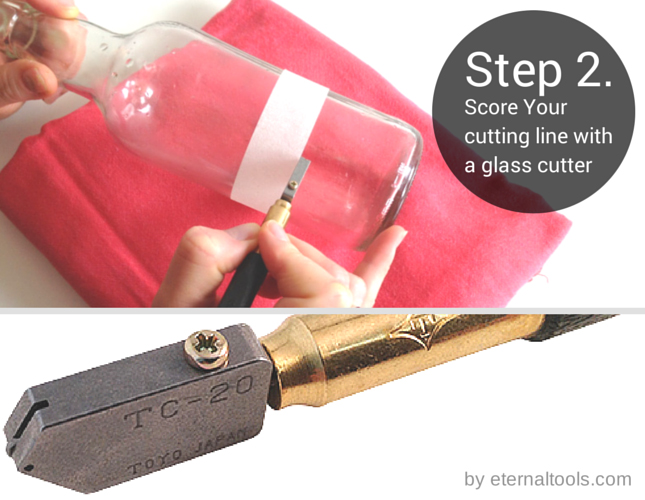
1. Rest your arm on something that will elevate it slightly such as a folded-up towel. This helps to keep your hand steady and at a good angle giving you greater control.
2. With your Toyo glass cutter, and resting your bottle on a hard surface, with a small amount of pressure score the glass bottle along the line of the masking tape around the bottle. (I sit the edge of the cutter up against the edge of the masking tape)
Helpful Note: Try to make one continuous cut line where possible as this will help keep the cut edge as neat as possible and save you from having to file or deburr too much to smooth off the edges.
Step 3. How To Cut Glass Using Hot & Cold Water

1. Take your bottle to the running cold water tap and whilst wearing your rubber glove on the hand you hold the bottle with, pour a small trickle of boiling water over the score line, rotating the bottle around as you do so. (you'll notice in the above image I was not wearing a rubber glove - very naughty. As my Mum used to say: Do as I say, not as I do!)
2. Next, run the bottle under the cold tap whilst rotating the bottle.
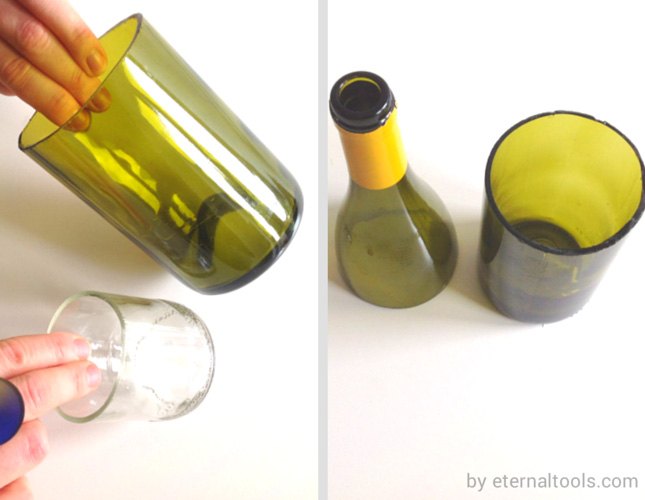
3. Repeat this process, alternating between the hot water and the cold water. When you start to hear the bottle making popping or cracking sounds it's about ready to fall away. This process takes a few minutes and you'll be left holding a piece of bottle in each hand.
4. Job done.
Helpful Note 1. Some people find It helpful to rest the bottle in a 'V' shape apparatus if you can find one, or indeed make one if you're handy in the woodshed. This helps rest the bottle steady and you can turn the bottle easily. Bottle cutting jigs can also be bought that come with a glass cutter fixed, however, these do not always work very well, or for very long.
Helpful Note 2. If you wish to cut towards the very bottom of the bottle, keep the bottle standing upright, rest your cutting hand on something that will elevate your hand and simply score the line whilst rotating the bottle at the same time.
Step 4. Smooth The Edges Of Your Cut Glass Bottle

There are many ways to smooth the edge of your bottle and it all depends on how much or how little you want to spend, how polished you want it to look and what tools and equipment you may already have that you can use.
To heat the glass enough to re-mould the edges and give a professional finish will take the use of a kiln so the following cold-working options are just simple methods with which to polish your edges without firing.
At the bottom, there is a summary of how I polished these particular bottle edges seen here in this article by simply using a large 600 grit diamond file.
For removing any snags and to even out the edge:
or if you have these items at home they will also work well.
- Sanding bands in a rotary tool, 320 grit. (A grit lower than this i.e 60 grit, will be too coarse)
- 3mm diamond drill bit or a 4mm diamond cylinder burr in a rotary tool (only use for bumps and snags and use slowly and carefully. Also use for shaping the edge of the glass. i.e scallop shaped or wavy edge)
- Wet and dry sandpaper 150-600 grit
- Diamond Grinding pads attachment for an angle grinder
For further fine polishing (optional):
- Black (medium grit) mini rubber silicone polisher in a rotary tool.
- Diamond paste for glass on a felt point
- Diapol diamond polishers
Using the Diamond File and other grinding polishers:
Use the file wet and gradually file away until you reach the smooth surface you're looking for. It makes a painful noise at first like nails down a blackboard, but bear with it! It eases off.
I used a square shaped, large diamond 600 grit file. Any shape such as a triangle, flat or half round will work as well. For small glass drinking bottles or beer bottles, I find a large diamond file that will file both sides of the top of the glass at the same time because the file is long enough and reaches both sides at once. This is great because it means I get even sides and both sides get filed down at the same time. Handy!
Personally speaking, using a diamond file is usually enough but if you want to polish up the glass surface further you can try any number of the other options I've mentioned above. The black silicone polisher used in a rotary hand tool works very well.
Any lumps and bumps along your edges can easily be removed by using a diamond cutter or a diamond cylinder burr, or a 3mm diamond drill bit. Do this before you file or polish. Go carefully with this though, it is very abrasive and if you're not used to using burrs in a rotary tool, one slip could cause your newly cut glass bottle to be scratched and destined to the scrap glass pile.
As with all these options, they are abrasives so be careful to stick to the edge and if you're using a rotary tool with any of the attachments be especially careful to keep a steady hand and don't go over the edges. It sounds obvious, but I've done it countless times myself and then had to start all over with a new glass bottle. (it may mean you get to enjoy another bottle of wine or beer, however - there's always an upside)
Helpful note 1. It is better to use the finest abrasive you can and grind away for longer rather than begin with an abrasive that is too coarse. You will find little 'bleed cracks' around the edge if the abrasive is too coarse.
Helpful note 2. If the tool or attachment you are using is made of diamond grit i.e. a diamond file, or a diamond burr always use them wet.
Rather than smooth the edges off, why not try scalloping the edges or making them wavy? Any number of diamond burrs in a rotary tool will do this for you but I like to use a 3mm diamond drill bit for this.
Safety Precautions
Water and electricity do not mix so please be extra vigilant if you are using a rotary tool near water, preferably in a flexible shaft. Always wear goggles, a face mask and long sleeves.
To oil or not to oil, that is the question.
Many traditionalists like to use oil with their glass cutters and some cutters have an oil reservoir at the top of the handle. However, with the advanced tungsten carbide wheels that are now used in glass cutters, oil is no longer necessary. The carbide cutting blade or wheel ensures you end up with a clean, neat cut with straight edges and because tungsten carbide is so durable the cutter head won't dull easily.
If you still feel like you would like to use oil it's best to pour a small amount of vegetable oil or mineral oil onto a piece of cloth in a bottle lid or small container and dab the cutter into it before using.
Cutting A Shape Into A Glass Bottle
The best method to cut a shape into a glass bottle is to first drill a hole in the surface of the glass with a diamond core drill and then use a diamond cylinder burr or similar shape to grind away from the inside of the hole outwards in the shape you wish to make.
See our infographic here on how to drill a hole in a glass bottle
Recycled glass bottles can be turned into many creative and useful items, here are a few ideas for you:
- wine bottle bird feeders
- tumblers decorated with mosaic tiles or engraved
- wind chimes
- lanterns, lamps and candle holders
- vases and posy pots
- water carafes
- pen pots
- storage jars
- toothpick holders
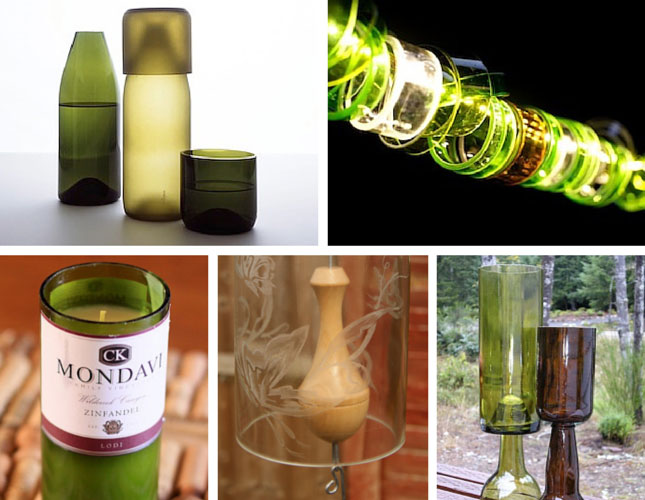
The above work from left to right is of a recycled water carafe and tumbler by re-modern.com, slices of cut wine and beer bottle light strand by Jonas Merian. The bottom row is a recycled wine bottle candle by Lina Smith, an engraved cut wine bottle wind chime by Stewart Neal and decorative glasses by Christine Majul on Flickr.
Trouble Shooting Tips
Crack lines around the top of the bottle may form due to several different reasons. It may be as simple as you need a replacement cutting head for your glass cutter. If you have a bottle you can't use because it has broken in the wrong place, don't bin it, use this bottle to practice with.
Below, I've listed some of the potential reasons for cracking and how to avoid it during the cutting process.
1. If you can, try to make the score line continuous. Where you stop the line and start again is where you may find the cracking. This is easier to do if you have some way of turning the bottle whilst scoring. Many people make their own wooden ‘jig’ which is essentially two pieces of wood that form a V channel in the middle that the bottle sits in. This way you turn the bottle with one hand and do the score line with the other. I don’t use this method personally but you may find it helps.
2. Practice with the water temperatures - if the water is too hot and too much hot in one go, your break will occur too soon and this can cause cracking.
3) Don't be tempted to score deeper, this shouldn't make any difference, but you need to apply enough pressure so you can see the score line clearly. Again, practice on a broken bottle or a piece of glass to find the right pressure.
4) Try a different type of bottle - this might sound obvious, but the best bottles I find for my work are small, clear glass, water bottles. The glass seems to be much, much thinner than other bottles and I get a clean cut every time. Red or white wine bottles have thick glass so you can never tell whether or not the bottle is going to be an easy one to break.
Helpful Note: Remember you will never get a completely perfect cut, you will always need to file down some sharp edges of the glass or deburr with a diamond file.
Good idea: Bad breaks don't have to mean the bottle goes in the bin. Instead of wasting the great work you’ve done, how about trying to decorate the lip of the cut bottle with ribbon or lace, or glue on beads, pieces of driftwood, sea glass and very small pebbles using a strong adhesive such as G-S Hypo Cement Adhesive.
This fabulous creation by Louise Nelson of Glassdaft is a superb example of how creative and artistic you can be with some empty glass bottles.
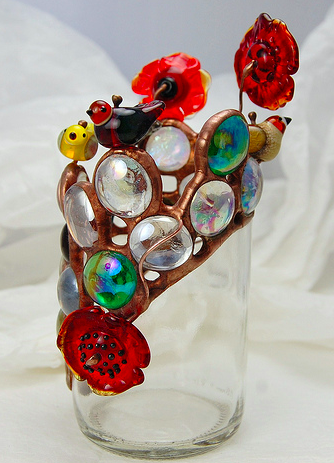
Recycled bottle with copper foil stained glass, fusing and lampworking. 2011